Do you LOVE designing, remodeling, and/or crafting your home into a personalized space? Do you LOVE breathing new life into old items? Do you LOVE saving money by tackling jobs around your home yourself? Do you ENJOY sharing your DIY wins (and maybe a few fails too) with others? If you answered YES to any of these questions, a DIY blog might be a perfect outlet for you!

So, don’t keep putting it off! Take 15 minutes and check out our 5 Steps to DIY Blogging below. Aren’t into DIY?! (Wait, what?!) Okay, well these steps can get any would-be blogger up and running!
Please note, this page contains affiliate links. If you click on a link and make a purchase, we may receive a small commission. However, there is no additional cost to you. The products listed herein are ones we use, trust, and therefore recommend!
Step 1: Domain Name & Website Host
First, you need a domain name for your blog. The domain name is the URL or web address for your blog (e.g. www.renosemipros.com). We settled on Renovation Semi-Pros after a few other options didn’t pan out, were already in use, or were just too awkward or too lengthy.
What’s in a name? Your domain name helps to define the feel and purpose of your blog. In reality, your ‘perfect’ name may already be someone else’s ‘perfect’ name! So, try this — jot down some name options. Focus on the ones that really speak the vision of your blog. If you are looking to start a DIY blog, do you have a niche (Modern design? Tropical design? Modern Tropical Design?). Next, hit the web to see if anyone else is using that name.
A great one-stop-shop is Bluehost.com, because you can search for domain names AND they are a great web host! Hosting your website means to store your content on a web company’s servers for you to add, edit, and access online. It’s like renting a home — you own the contents, but you are renting the space to use.
On Bluehost, you can search Domain Names, purchase the perfect domain name for your blog, AND sign up for hosting. In fact, if you use our links below, when you purchase 12 months of hosting, you’ll receive a FREE domain name for a year!
Visit Bluehost.com and select the “Get Started” button.

Choose a Hosting Plan
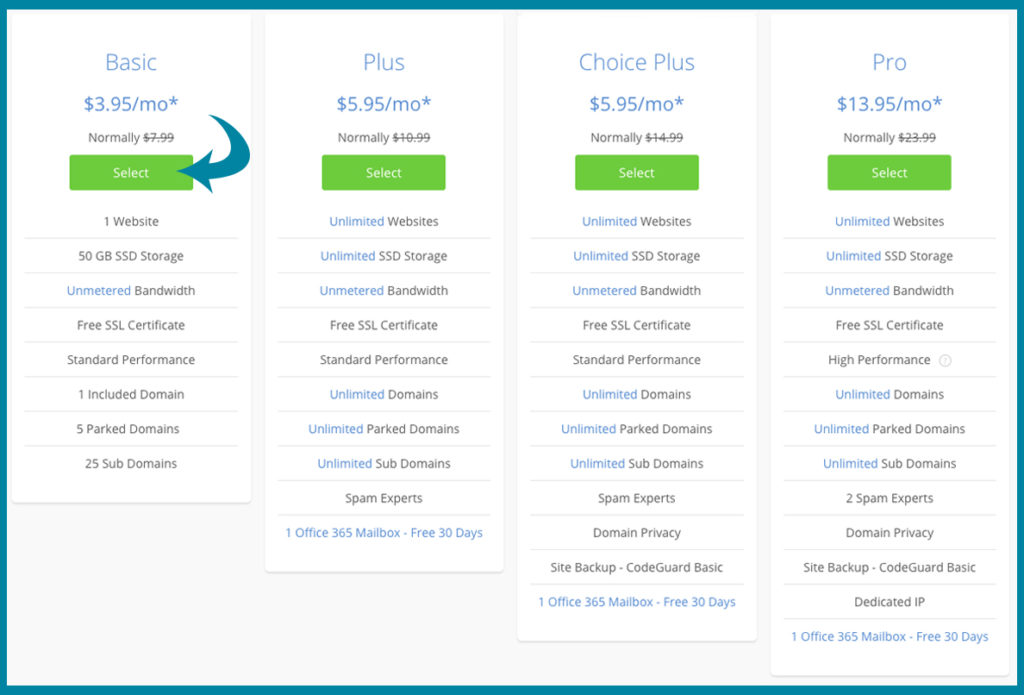
With Bluehost, there are several hosting options to choose from. If you are just starting a blog, the Basic plan is a great choice with plenty of space and features to get you started. But check out all the options to see what makes sense for your needs.
Choose Your Domain Name
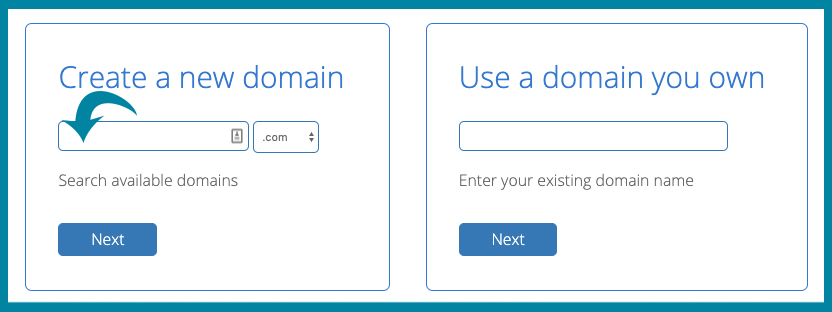
Next, you’ll be directed to select your domain name. Using the search feature, search the name(s) you jotted down earlier. Once you find one you love, add it to your cart.
Select Domain Privacy
Continue on to the Package Information screen. We HIGHLY recommend the Domain Privacy Protection. This inexpensive feature is worth its weight in gold! It hides your personal address and phone numbers from the publicly visible Whois database, which in turn protects you from marketers and spammers.
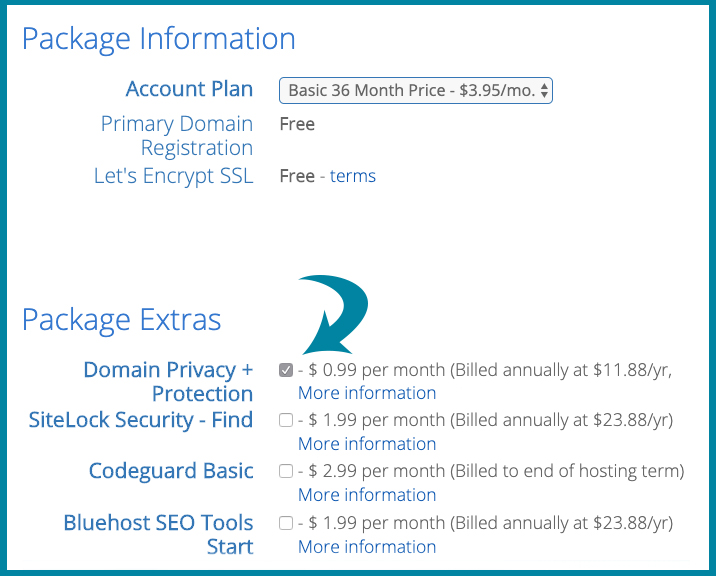
That’s it! You’re now the proud owner of a domain name and a hosting account to share your blog with the world! So, how do you do that exactly?! WordPress.org!
Step 2: WordPress Theme
We chose WordPress.org as the content management platform to run our blog because it’s pretty simple to use, has TONS of support online (have a question – the answer is definitely out there), and has a robust community of developers who constantly push out new features!
If you purchase your hosting with Bluehost, you are in luck! Bluehost makes it really easy to setup a WordPress blog. They offer step-by-step WordPress install instructions for your site. They also include free WordPress Themes to design your blog’s layout. But many bloggers go a step further and purchase a premium theme.
Premium WordPress Themes
Premium theme – sounds fancy and expensive! Yes and no! It depends on the vendor you purchase your theme from. Some vendors include things for which other vendors charge you extra. No worries! We have recommendations!
17th Avenue Designs — Our current theme is from 17th Avenue Designs. These are beautifully and thoughtfully designed themes with all the features you could ever want/need. 17th Avenue themes are Child Themes for the Genesis Framework. The Genesis Framework is a secure, SEO foundation for WordPress websites. And Genesis Child Themes are built to integrate seamlessly with all the fantastic features Genesis offers. In short – you want this!

A HUGE perk of purchasing a theme from 17th Avenue Designs is that the Genesis Framework, otherwise $60 if purchased separately, is INCLUDED with your theme purchase! Money saved y’all!
Once you select your theme, if you are purchasing one, you will receive an email with a .zip file. Back in your WordPress panel, go to the Appearance tab, and upload your .zip file theme.
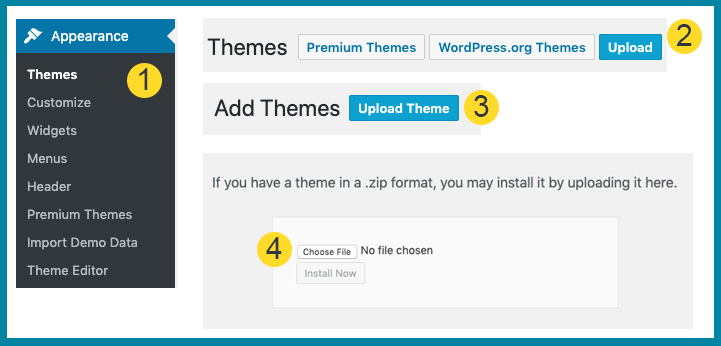
If you choose 17th Avenue Designs, they offer complete step-by-step instructions on how to install, customize, and add content to your new theme! Still not comfortable? 17th Avenue Designs also offers an installation service where they will set everything up for you.
Step 3: Creating Engaging Content
So, now you have a gorgeous blog site just waiting for content! Where to begin?
A lot has been written about the importance of finding your voice, branding your content, and writing engaging and interesting content people want to read. We won’t repeat it all again here, but we will stress how critical it is to do all of the above.
Readers want easy-to-read, fun, relevant, picture-filled posts! Provide them with great content and readers will return again and again! ♡
Step 4: Social Media
Spend some time thinking about which social media channels you want to target initially. There are a TON of them to choose from, but not all of them will be worth your time. Why? If you have a DIY blog (or whatever your niche), some social media outlets will be better suited to reach your audience.
Many, if not most, DIY bloggers are on Pinterest. It is great for images, step-by-step posts, and quick headlines like “5 Steps to DIY Blogging!” It’s easy to get started on Pinterest too — just Create a free Business Account.
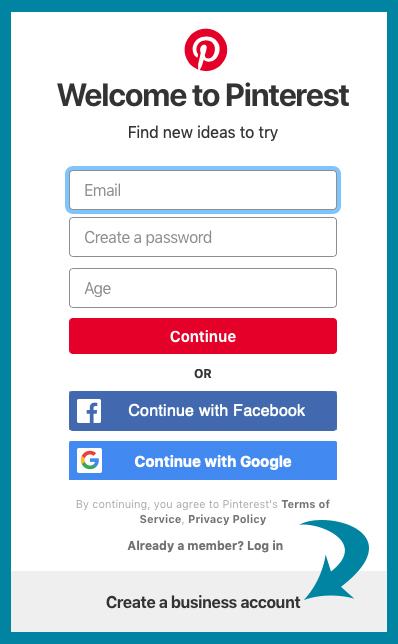
Other outlets that may interest a DIY blogger include Facebook, Instagram (also image-centric), YouTube (if you’re doing to have videos), and Twitter. Start with a few social media accounts, track which bring you the most views, and focus your efforts there. Don’t be afraid to try a new outlet on occasion…you may find others better suited to your niche.
Step 5: Advertising
Once you have your blog up and running, you may begin to wonder if you can make passive income from your site. The short answer is “Yes.” The long answer is “Yes, but it can take a time, effort, patience, and some luck.”
We recommend beginning with a defined Advertising Strategy. Most bloggers start a site because they want people to read and enjoy their content. Ads can play a role in this, but if your site is OVERRUN with advertisements (you know what we mean!), you can actually turn away readers. Consider taking a targeted approach to ad placements.
Google AdSense is a great place to start for beginners. Once setup, they will give you the ad code (simple to put in WordPress) and you can decide where you want it. You can use the Google dashboard to track your ads and determine best placement.
Amazon Affiliates is another option for newer bloggers. You place account-specific web links to products in your blog posts. Qualified purchases from those links earn you a small commission. Of note — it can take some time to be accepted to Amazon’s program, and if you do not make a qualified sale within 90 days of signing up, you are dropped. You are eligible to reapply in the future however.
Sovrn is another advertising platform suited to bloggers with some solid content and who aren’t quite as green. They allow you to set your CPM rate and help tailor ads to your niche. They also provide powerful analytics on the backend to help you get the most from your blog.
Want to learn more about the many resources we use to run our blog – check out our Blogging Resources and Equipment page for more!
